Server Mode Signatures
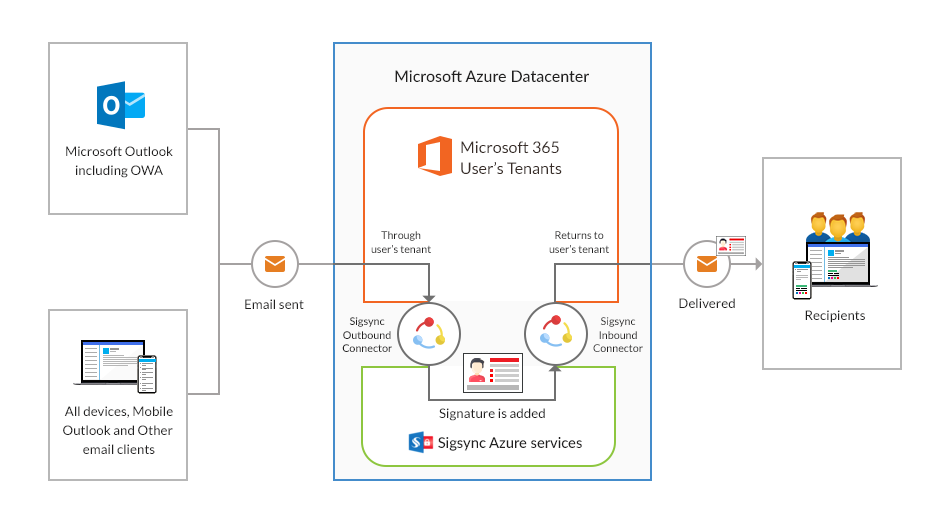
Sigsync Server Mode applies professional email signatures and disclaimers at the server level by routing emails through secure Sigsync Azure services. Since signatures are added centrally after the message is sent, they appear consistently across all devices and email clients — including desktops, laptops, Macs, and mobile phones.

How Sigsync Server Mode Signatures Work
Sigsync Server Mode is a cloud-based service that uses a secure TLS connection with Microsoft 365 servers to process emails and apply signatures. When enabled, connectors and rules are automatically created in your Exchange Online environment, ensuring seamless routing and processing.
Here’s how the process works:
- You send an email from your Microsoft 365 account.
- Microsoft 365 applies Sigsync routing rules to the outgoing email. If the conditions match, the email is securely forwarded to Sigsync using the Outbound Connector via TLS.
- Sigsync receives the email, applies the configured signature rules (signatures, disclaimers, banners, etc.), and processes the message.
- The email is returned to Microsoft 365 through the Inbound Connector over TLS.
- Finally, Microsoft 365 delivers the email to the recipient, now stamped with the appropriate Sigsync signature.
This server-side model ensures centralized control, compliance, and consistent branding, without requiring users to configure signatures locally.
Steps to Set Up Server Mode Signatures
Step 1: Login to the Sigsync Dashboard
If you’re new, create a Sigsync account or sign in directly with your Microsoft account. The dashboard will automatically guide you through the configuration process.
Learn more on how to sign up with Sigsync
Step 2: Register Tenant and Configure Signatures
Use your Office 365 Global Admin account to register the tenant with Sigsync. During registration, the wizard automatically configures the required inbound/outbound connectors and transport rules in Exchange Online. You only need to follow the wizard instructions.
Learn more on how to register and configure signatures
Step 3: Create Signature Templates
Easily create email signature templates using the Sigsync signature editor. Add details from Azure Active Directory, such as name, job title, photo, and company information. You can also import your own HTML code or choose from a gallery of ready-made templates, and start from scratch.
Learn more on Creating Signature Templates
Step 4: Set Signature Rules
Set signature rules to control when and to whom email signatures are applied. You can create rules based on senders, recipients, specific keywords, or Active Directory groups, ensuring the correct signature is added to every outgoing email.
Learn more on Setting Signature Rules
Step 5: Add SPF Record to Your Domain
Include the Sigsync Azure Service in your domain’s SPF (Sender Policy Framework) TXT record to ensure emails pass security checks and are not flagged as spam, junk, spoofed, or phishing by Exchange Online Protection (EOP)
Streamline Email Signature Management with a Free On-demand Demo from Sigsync
Sigsync email signature service provides effortless, centralized signature management for Office 365 and Exchange. Our team can assist you in quickly setting up company-wide signatures. Request a free on-demand demo to see how Sigsync can simplify your email signature management process.

