Dynamic Fields
Sigsync allows dynamic Active Directory fields such as first name, last name, job title, department, office location, phone number, company name, address etc. in the signature. These fields are populated with information from the Active Directory details.
Personal fields
The ‘Personal fields’ component inserts a group of personal fields at once, such as Display name, job title, company name etc. in the template.
- Drag and drop the ‘Personal fields’ component into the design area
- The default personal fields are displayed
- You can replace the existing active directory (AD) field by clicking on ‘AD’ (
 )
) - Click on ‘T’ (
 ) to manually enter the text in the field
 - Click the ‘Up’ ( ▲ ) and ‘Down’ ( ▼ ) arrows to change the position of the fields
- The field can be cleared the by clicking the ‘
 ’ icon
 - Click ‘
 ’ to delete the field
 - Click the ‘Add Field’ button to add new field
Layout
The selected personal fields can be displayed in multi-line layout or single line layout.
Multi-line layout
All the selected ‘Personal Fields’ will be displayed in multiple lines.
Single line layout
All the selected ‘Personal Fields’ will be displayed in a single line with a field separator to differentiate between the fields.
You can uncheck the ‘Show field separators’ if you don’t want them to be displayed in the email signature
Click the ‘Apply’ button
Address Fields
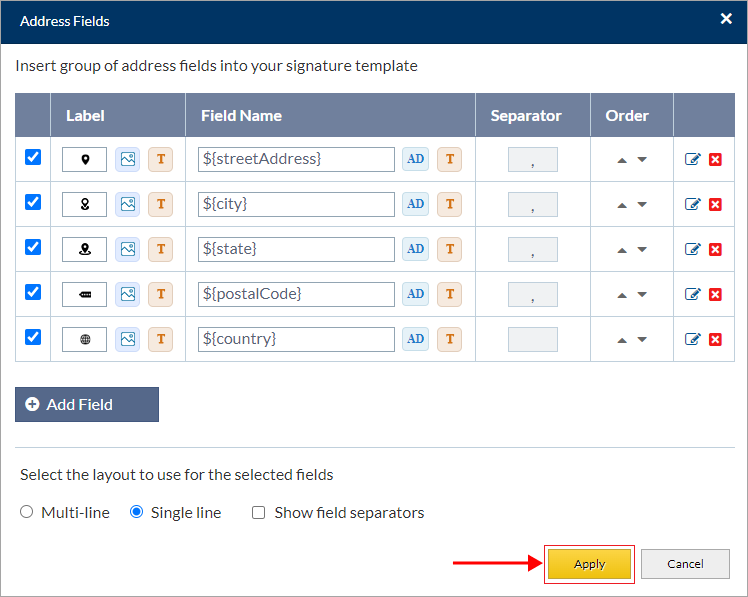
The ‘Address fields’ component inserts a group of address fields in the template at once, such as street address, city, state, country etc.
- Drag and drop the ‘Address’ component into the design area
- The default address fields are displayed
- Click ‘ (
 ) ’ to insert the text label
 - Click the image icon (
 ) to replace the existing icon
 - You can replace the existing active directory (AD) field by clicking on ‘AD’ (
 )
) - Click on ‘T’ (
 ) to manually enter the field
 - Click the ‘Up’ ( ▲ ) and ‘Down’ ( ▼ ) arrows to change the position of the fields
- The field can be cleared the by clicking the ‘
 ’ icon
 - Click ‘
 ’ to delete the field
 - Click the ‘Add Field’ button to add new field
Layout
The selected address fields can be displayed in multi-line layout or single line layout.
Multi-line layout
All the selected ‘Address Fields’ will be displayed in multiple lines.
Single line layout
All the selected ‘Address Fields’ will be displayed in a single line with a field separator to differentiate between the fields.
You can uncheck the ‘Show field separators’ if you don’t want them to be displayed in the email signature
Click the ‘Apply’ button
Contact Fields
‘Contact fields’ component inserts a group of contact fields such as business phones, fax number, mobile phones, mail, website etc. in the template at once.
- Drag and drop the ‘Contacts’ component into the design area
- The default contact fields are displayed
- Click the image icon (
 ) to replace the existing icon
 - Click ‘ (
 ) ’ to insert the text label
 - You can replace the existing active directory (AD) field by clicking on ‘AD’ (
 )
) - Click on ‘T’ (
 ) to manually enter the field
 - Click the ‘Up’ ( ▲ ) and ‘Down’ ( ▼ ) arrows to change the position of the fields
- The field can be cleared the by clicking the ‘
 ’ icon
 - Click ‘
 ’ to delete the field
 - Click the ‘Add Field’ button to add new field
Layout
The selected contact fields can be displayed in multi-line layout or single line layout.
Multi-line layout
All the selected ‘Contact Fields’ will be displayed in multiple lines.
Single line layout
All the selected ‘Contact Fields’ will be displayed in a single line with a field separator to differentiate between the fields.
You can uncheck the ‘Show field separators’ if you don’t want them to be displayed in the email signature
Click the ‘Apply’ button
AD Fields
The ‘AD Fields’ component inserts an Active Directory field in the template. Select the required Active Directory field from the dropdown and click the ‘Apply’ button. You can add a single AD field at a time.
You have an option to hardcode (static) the field on the right side of the popup window
Click the ‘Add Static Photo’ button to insert the static profile photo or logo in the template
Custom AD
The ‘Custom AD‘ component allows you to insert custom attributes in the signature template. It automatically fetches the details from your Office 365.
Click here to know how to set custom attributes in Office 365 and use them in your signature using Sigsync
Message Properties
The ‘Message Properties’ component dynamically inserts the required message properties in the signature. You can insert one of the following message properties.
- Message ID: It's a unique identifier for digital messages used in email messages.
- Message Date: It's the date of the email message, when it was composed.
- Message Subject: It's the subject line used in an email message.
- Message currentDatetime: It's the current date time of the received email message
Dynamic field properties
To customize dynamic fields, choose the field from the design pane, then set the required properties in the ‘Property Pane’ on the right side of the Sigsync Editor.
Here are the dynamic field properties:
- Font Family: Choose the font type for the selected field.
- Font Size: Set the size of the selected font.
- Font Weight: Choose the weight (thickness) of the selected font.
- Font Color: Choose the color of the selected font.
- Font Style: Select the style of the selected font (bold, italic, underline, etc.).
- Background color: Choose the background color for the selected field.
- Alignment: Set the alignment of the selected field (left, center, right).
- Height: Specify the height of the selected field.
- Width: Specify the width of the selected field.
- Top padding: Set the padding (space) at the top of the selected field.
- Right padding: Set the padding (space) at the right of the selected field.
- Bottom padding: Set the padding (space) at the bottom of the selected field.
- Left padding: Set the padding (space) at the left of the selected field.
- Top border: Set the border style at the top of the selected field.
- Right border: Set the border style at the right of the selected field.
- Bottom border: Set the border style at the bottom of the selected field.
- Left border: Set the border style at the left of the selected field.
- Border all: Apply the same border style to all sides of the selected field.
- Border width: Set the width of the selected border.
- Border style: Choose the style of the border, such as dotted or solid.
- Border color: Choose the color of the border.
- Border separate: Add a separate border to the field.
- Border collapse: Combine borders that are next to each other into a single border.
- Background image: Add an image to the background of the field.
- Azure AD field: Replace the current Active Directory field with a different one of your choice
- Static Field: Convert a dynamic Active Directory field into static text, which enables you to showcase information that doesn't frequently change in your signature.
- Static Profile Photo: Add a static profile photo to the signature.
- Edit Custom AD : Replace the current custom Active Directory field with a new one that you choose
- Edit Message Properties: Allows you to select a new message property to replace the existing one
- Hyperlink: Add a hyperlink to the field.
- Display / Hide Signature fields: Choose which fields to display or hide in the signature.
- Add / Remove New Line (line break): Add or remove a line break between the signature fields .
- Analytic Link: Add a link to track analytics for the signature.
Streamline Email Signature Management with a Free On-demand Demo from Sigsync
Sigsync email signature service provides effortless, centralized signature management for Office 365 and Exchange. Our team can assist you in quickly setting up company-wide signatures. Request a free on-demand demo to see how Sigsync can simplify your email signature management process.


